Cooking thin chicken breast in the oven is an art. It requires precision and expertise. In our culinary journey, we must master this skill. As passionate cooks, we perfectly understand the importance of balancing tenderness and flavor. This comprehensive guide will delve into the intricacies of cooking thin chicken breast. You will master the art of cooking it. It will ensure a delightful dining experience for you and your loved ones. In this article we will find How Long To Cook Thin Chicken Breast In Oven?
Read More: How To Cook A Boston Butt In The Oven?
Perfect Temperature:
Preheat for Perfection:
Preheat your oven to 375 degrees Fahrenheit. This will ensure your thin chicken breast is cooked perfectly. This optimal temperature sets the stage for a succulent and evenly cooked masterpiece.
Read More: Can You Put Tin Foil In The Oven?
How Long to Cook Thin Chicken Breast in Oven?
How long should thin chicken breasts be baked to make them moist and tender? Breadless chicken breasts are a cheap and nutritious dinner for your family. They cook up fast. This is another hit if you tried our recipe for how long to cook thin pork chops in the oven and loved it.
Cooking thin chicken breasts is undoubtedly a skill. Biting into a piece of dry poultry is disappointing. You realize your mistake. No amount of sauce can correct that. The protein should only be cooked to 165 degrees for fork-tender pieces. (There are affiliate links.)
How Long Does an Oven Take to Cook Sliced Chicken Breast?
We’ve already discussed how long it takes to bake a chicken breast at 350°F, but that recipe called for a bone-in, skin-on Chicken that was kept whole. They take a good deal longer. It’s still delicious when finished, but there’s a trick if you want the tastiest meat or are in a hurry. We’ll prove how to pound it flat for the best results. Melt meat in your tongue.
The “regular” version is about 13 minutes longer than this condensed version. The time difference between the “regular” and this condensed version is about 1 hour! Yes, there is a significant difference. Whether you use your oven or an air fryer for thin chicken breasts is the same. The benefit isn’t limited to timing. When roughly half an inch thick, each bite is highly buttery and practically melts on your tongue.
Read More: Can You Boil Oven Ready Lasagna Noodles?
Oven-baked thin chicken breast:
We have instructions for making almond-crusted Chicken. If you want to add low-carb breading to your Chicken. But, the Chicken tastes great with just seasoning. If your breasts are incredibly thick, you can cut them in half or thirds and stop there, just like we did. You can also take things a step further if you’d like.
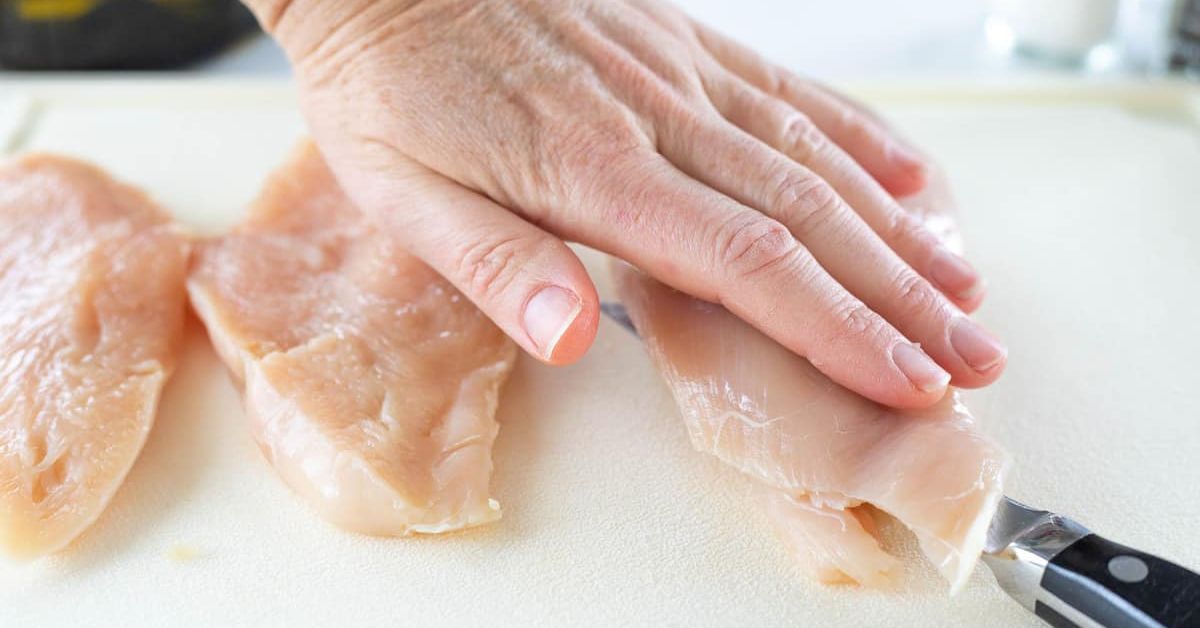
One way to achieve a more uniform and thinner texture of meat is to pound out chicken breasts. This facilitates quicker and more even chicken cooking. It produces a juicy and tender dish. How to pound out chicken breasts is as follows:
- Place a piece of parchment paper on a spotless, level surface like a cutting board. By doing this, the boneless chicken breasts won’t stick together.
- Place one piece on the wrap to avoid splattering when pounding. Leave enough space around it.
- Add another layer of parchment paper or plastic wrap on top.
- With a rolling pin or meat mallet, begin pounding. Pound the meat gently outward from the center. To get a consistent thickness, work in equal sections. Aim for a thickness of between 1/4 and 1/2 inch.
- Turn over and bash the other side. After removing the outermost layer of plastic wrap, turn the chicken breast over. Cover it with plastic wrap once more to guarantee even thickness and pound the other side.
- One by one, repeat with the remaining pieces.
Pounding meat thinly, like with chicken cutlets, is an easy method. It dramatically alters how your dishes turn out. They will bake faster and more evenly. This will produce a flavorful and tender meal. The thinner and more even they get.
Recipe for Slender Chicken Breasts:
The most important thing to keep in mind is to cook them quickly. Cut into the center to check for doneness. It’s the best way because they are delicate. A meat thermometer won’t fit inside. You can proceed if the meat turns white and loses its transparency. When the internal temperature of the meat reaches 165 degrees, the juices should run clear.
- Set the oven’s temperature to 360 degrees Fahrenheit.
- Thinly slice the chicken fillet in half. Place each piece between two pieces of parchment paper. If you’d like it even tinier, flatten it with a meat mallet.
- Combine salt and spices. After sprinkling spices on both sides, drizzle each slice with olive oil.
- Chicken fillets should be placed on a baking sheet lined with nonstick foil.
- Bake for ten minutes thinly sliced chicken pieces.
- Turn each piece over and continue baking it for three to five minutes. It depends on how thick it is. Or, bake it until the interior reaches 165 degrees F and turns white.
After you flip them over, brush on any sauce you want to bake on and get a little thicker and caramelized. For a sweeter bite, try making teriyaki chicken or barbecued Chicken.
Recipe for Trim Chicken Breast:
So many options are available now for seasoning the Chicken and using sauces. I frequently take a few spices out of my cabinet and sprinkle them on; in those situations, I never measure. These wings are addictive. They’re topped with our incredible dry rub, making them sweet and savory.
- The chicken breasts can be seasoned with either garlic powder or minced fresh garlic.
- With no fresh onion texture, onion powder adds a mild onion flavor.
- The Chicken gains color and a hint of smoky flavor from the paprika.
- Dried herbs like oregano, basil, thyme, and rosemary are combined. This makes Italian seasoning. This seasoning gives chicken a Mediterranean flavor.
- Use chili powder or a cayenne-cumin mixture for smokiness and heat.
- For a zesty, refreshing taste, grate some lemon or lime zest over the Chicken.
- Experiment with dried herbs such as sage, parsley, rosemary, and thyme. This will deepen the chicken’s flavor.
- If you enjoy spicier flavors, Cajun or Creole seasoning is excellent. It combines a blend of herbs, spices, and heat.
How to Add Flavor to Chicken?
- Arrange the parts on a sanitized surface or a plate.
- Season both sides with the desired amount of salt and pepper.
- Add any extra herbs or seasonings that you like. Give generously, but change the serving size to suit your tastes.
- Drizzle olive or cooking oil over the top to help the seasonings stick. This will keep the chicken moist while cooking.
- Make sure the chicken breasts have an even side coating by rubbing in the oil and seasoning.
- Before cooking, let it rest for a few minutes. This enables the meat to absorb the flavors.
When they are all correctly seasoned. Then prepare them for cooking with your favorite technique. Baked, grilled, or roasted Chicken are all excellent options.
Proceed with your preferred accompaniment and serve!
Oven-baked chicken cutlets:
I am addressing some of the questions people have asked about this in advance. Go ahead and jump straight to the recipe if that’s how you want to proceed, but first consider this;
Read More: How To Cook Brats In The Oven?
How can a thin chicken breast be prepared?
- Begin with a skinless and boneless piece.
- Place on a chopping board and cut in half or thirds with a sharp knife to get a 1/2′′ thick piece.
- If you’d like it to be even softer, sandwich that piece between two pieces of parchment paper. It will be like baked chicken cutlets.
- Use a mallet to pound thinner for meat, flip it over, and pound the other side again.
When a thinly sliced chicken breast is done, how can you tell?
Cutting into the center of a thin chicken breast is the best way to determine when it’s cooked and safe to eat. Eating is safe and has reached 165 degrees if the meat is white, no longer translucent, and the juices run clear. Test the thickest part of the meat if you have a meat thermometer.
Read More: How To Toast Bread In Oven?
How long is a thin chicken breast cooked at 350 degrees?
It takes about 13 to 15 minutes to bake thin chicken breasts to a safe internal temperature of 165 F if you have sliced them very thinly. Size and thickness will determine how long to cook, but they cook quickly and turn out moist, if not overdone.
How to Prepare Trim Chicken Breasts?
After reading about baking and air-frying these, you may wonder how to cook them on a stovetop. Use medium-high heat. Apply the olive oil coating and seasonings in the same way as instructed. To cook this in a skillet, sear the outside of the meat quickly. Then reduce the heat, cover it, and cook, turning the meat only once. Continue cooking until the inside is white and the juices run clear.
It would help always to wait for leftover food to cool completely before using it. After that, pour into a freezer bag, press out any remaining air, and keep chilled for up to three days. The following day, try one of our simple recipes for leftover Chicken.
Read More: How To Cook Tri Tip In Oven?
Chicken Breast Types:
Not every chicken breast is made equally. The weight and type of chicken breast will determine how long to cook it in the oven. For example, bone-in or skin-on. The two varieties of chicken breasts are next to each other in the meat case. But, their tastes and appearances couldn’t be more dissimilar. Cooking chicken with skin on and bones intact may seem complex. But, they usually make baked chicken breast more succulent and delicious. The rendered fat and intact bones are the reason. Continue reading to determine how long to bake each type for optimal results.
Optimal Oven Temperature for Chicken Cooking:
A 375-degree Fahrenheit oven is required for many baked chicken breast recipes on Food Network Kitchen. This is so that the chicken breast cooks through quickly and evenly. It leaves the meat juicy and tender.
Read More: How To Cook Sausage In Oven?
How to Determine When to Stop Cooking a Chicken Breast?
If we didn’t mention instant-read thermometers, they are likely your best bet. Use them to figure out when your chicken is done. Insert an instant-read thermometer into the thickest area of the breast. You want the final temperature to be 165 F. To ensure no visible pink meat, use a paring knife to cut into the thickest part of the chicken. If you don’t have an instant-read thermometer, use this method.
Should You Rest Baked Chicken Breasts?
To preserve the juice and flavor of your cooked chicken breasts, let them rest for at least ten minutes before slicing.
Read More: Can You Put Cardboard In The Oven?
Best Way to Keep Baked Chicken Breasts:
Once the chicken is cooked, allow it to cool fully. Store it in an airtight container in the refrigerator for up to four days. Or, please put it in a plastic bag that can be sealed. Make sure all the air is out of the bag. Freeze it for up to four months.
How to Bake a Breast of Chicken:
Use the method in this Baked Chicken Breasts with Parmesan Crust recipe. It will make the chicken breasts tender, flavorful, and juicy. Breading the chicken in step two is optional. It produces a crispier texture and a more golden color.
Read More: Is Popcorn Popping In A Microwave Oven Endothermic Or Exothermic?
Turn on the oven to preheat:
Start the oven at 450 degrees Fahrenheit.
Season and pound the Chicken.
Sprinkle salt and pepper all over the chicken breasts. You can use a meat mallet to pound the chicken breasts until they are evenly cooked and their thickness is even.
Possibly Toast the Chicken:
Apply Dijon mustard all over the Chicken. Coat the chicken with a mixture of panko breadcrumbs and freshly grated Parmesan. Use equal amounts.
Cook the Chicken:
Place the chicken onto a rack atop a baking sheet. Give it a light mist of cooking spray. Place the sheet in the oven’s center. Bake 8-ounce skinless, boneless chicken breasts for 15 to 20 minutes. Cook until golden and done. You can check the doneness of the Chicken by sticking an instant-read thermometer into the center of the breast.
Read More: How To Cook Mahi Mahi In Oven?
Give the Chicken a rest:
Before slicing or serving, give the Chicken five minutes to rest.
Methods for Boiling Chicken Breast:
Once you master the preparation described in this poached Chicken for the salad recipe, you’ll always have perfectly poached Chicken on hand. You can add it to wraps, grain bowls, salads, and sandwiches. Boil bone-in, skin-on chicken breasts in chicken broth with aromatics. This creates a flavorful result. Save the cooking liquid—this recipe also yields a delicious homemade chicken broth.
Fill a pot with Chicken and aromatics:
Place the skin-on, bone-in chicken breasts in a medium saucepan. Add the parsley, thyme, onion, carrot, and celery. Add chicken broth on top and heat until it barely boils. Cover and reduce the heat to a shallow level.
Read More: Can You Put A Crock Pot In The Oven?
Steal the Chicken:
When the Chicken is firm to the touch, poach it (with the lid on) for about 20 minutes.
Let the Chicken Cool:
After taking the pan off the burner, leave the Chicken covered and let it cool in the liquid for half an hour.
Take Out the Skin and Bones:
Place the Chicken on a chopping board and set aside the juice. Remove the Chicken’s bones and skin, and chop the meat into cubes. Throw away the skin and bones.
Pour the Broth Through a Strainer:
After straining, cover the broth and keep it in the fridge for three days, or freeze it for later use. Before using, skim any fat off the top of the broth.
Recipe for Stove Cooked Chicken Breast:
This recipe is for Easy Juicy Chicken Breast. It provides a simple stovetop method for cooking chicken breasts. To prevent drying out, finish the chicken breasts in the oven in a covered skillet with a small amount of broth.
Tumble the chicken breasts and season them:
Heat the oven to 300 degrees Fahrenheit. Place two skinless, boneless chicken breasts in a large resealable bag. Or, cover them with plastic wrap. Pound the Chicken to an even thickness using a meat mallet or the bottom of a heavy skillet. Give the Chicken a generous amount of salt and pepper on both sides.
Use a skillet to sear the Chicken:
Over medium-high heat, preheat a medium skillet (with a lid). Add a small amount of olive oil and swirl to coat the skillet. After adding the Chicken to the skillet, cook it without moving for one minute. After flipping, cook the other side for an more minute.
Complete the Oven Cooking of the Chicken:
Pour two tablespoons of chicken stock, place a lid on the skillet, and put it in the oven. Simmer for 8 minutes with a lid on. Place the skillet on the stovetop without any heat. Leave it without opening the lid for an more eight minutes.
Verify Doneness and Present:
Check the internal temperature of the chicken after 8 minutes. Stick an instant-read thermometer into the thickest part of the breast. The temperature should read 165 degrees Fahrenheit. Cut into pieces and present.
How to Cook Chicken Breast on the Grill?
Start with bone-in, skin-on breasts for juicy, flavorful grilled Chicken. See our story on How to Grill Chicken for a thorough how-to guide.
15 Minutes before cooking, prepare the Chicken:
Using paper towels, pat dry the breasts to absorb any remaining moisture. This keeps the skin crisp. Next, liberally season both sides with freshly ground pepper and kosher salt. Let the Chicken sit at room temperature for fifteen minutes. This allows the seasonings to seep into the skin and guarantees uniform cooking.
In the interim, Warm Up a Spotless Grill with Two Heating Areas:
Establish an excellent zone to cook the Chicken gradually and a hot zone to crisp and char the skin. For fifteen minutes, preheat the grill while it is covered and the lid vents open. At 500 degrees Fahrenheit, the fire should be scorching.
Begin to cook the Chicken on the excellent zone grill:
Place the Chicken skin-side up on the side of the more excellent grill. For about fifteen minutes, cook with the lid closed. Periodically check; if the outside of the Chicken is burning, transfer it to a colder location. When an instant-read thermometer inserted into the center of a chicken breast registers 150 degrees F, cook the chicken for an more 15 minutes. Use tongs to flip it over and cover it.
Apply Sauce, If Using:
If you’d like, you can brush the Chicken with sauce.
Complete the Hot Side Cooking of the Chicken:
After about five minutes, move the Chicken to the hot side of the grill to finish cooking and crisping. Once the breasts’ internal temperature reaches 160 degrees Fahrenheit, remove them. Let the chicken rest for at least five minutes before serving. During this time, the internal temperature will rise by approximately five degrees. The doneness temperature is 165 degrees Fahrenheit.
How to Marinate Chicken?
It’s reasonable to assume that no one likes their chicken dry. Everyone can choose their preferences. For example, bone-in vs. boneless or shredded vs. sliced. Fortunately, marinades are made just for that. Any chicken, regardless of how it’s cooked, turns out tender and flavorful every time. This is thanks to an adaptable and simple-to-make mixture. But, how long should I marinate, and what’s the best method? See our professional advice below.
What Does a Marinade Contain?
- Most marinades must five essential ingredients: fat, acid, aromatics, seasonings, and salt. Alcohol, sugar, and enzymes are occasionally utilized as well.
- Vegetable or olive oil acts as a vehicle for flavor and aids in the spices and aromatics sticking to the meat.
- The acid is frequently found in vinegar, citrus juice, buttermilk, or yogurt. It keeps the meat moist and tender.
- Salt draws water out of the meat, helping to tenderize it. Aromatics, seasonings, and salt add flavor and balance.
- Select complementary flavors for the most delicious marinades. For example, the acid in a BBQ chicken marinade works best when made with apple cider vinegar. But, a drunken tequila marinade begs for lime or orange juice.
Chicken Marination A Step-by-Step Guide:
After choosing a recipe (this one is great for beginners), follow these guidelines. They will help you achieve flawless results.
Step 1- Prepare the marinade:
Combine the marinade ingredients in a large plastic bag. The ingredients are fat, acid, aromatics, seasonings, and salt. Seal the bag. Shake the bag until everything is well combined.
Step 2- Include the Chicken:
Once the bag is open, add the chicken pieces, close it, and shake it to coat the Chicken evenly. Excellent for a small of two hours or as long as twenty-four. Alternately, freeze for up to 30 days.
Step 3- Let the Chicken Cook:
Thaw the bag in the fridge for the entire night if it’s frozen. Or, thaw in the microwave at 30% power for one-minute intervals. Or, you can thaw under running water.
Take the Chicken out of the marinade and cook it but you like (recipes are provided below).
How Much Time Is It Safe to Marinate Chicken?
Chicken can be marinated for two to twenty-four hours. But, if you’re pressed for time, you can still add flavor with a 15-minute marinade. This works well for smaller cuts of meat. Generally, boneless chicken parts need less time to marinade than bone-in ones.
Keep the chicken marinating for up to 24 hours. This will cause the marinade to gradually break down the fibers in the meat. It will result in mushy chicken. But, marinated Chicken can be kept in the freezer for up to a month.
How to Prepare Marinated Chicken?
You can cook marinated chicken in various ways. For example, you can deep-fry it, broil it, or roast it in the oven. But, grilling is probably the most popular method. The marinade keeps the chicken from drying out on high heat.
Any excess marinade that is still raw should be thrown away, regardless of how you prepare it. Or, cook the marinade to a rolling boil to cut any bacteria. Then, brush the chicken after it’s cooked.
Recipes for Marinading Chicken:
These simple marinades range from honey mustard to chimichurri. They are sure to enhance flavor.
Marinaded Chicken with Chimichurri:
This marinade is vibrant and flavorful. It’s loaded with plenty of minced garlic and fresh and dried herbs. You can quickly make it in the food processor.
Marinade of Barbecued Chicken:
Kids will love this marinade right away because it’s sweet and tangy. Prepare ahead of time, store in the freezer, and then defrost during a hectic workweek.
Curry Marinade for Chicken:
This marinade includes curry powder, garam masala, and grated fresh ginger. It will give life to chicken breasts.
Chicken marinade with honey mustard:
The traditional honey-mustard combination is always a good choice. Marinades are no different. Simple and delicious!
What’s the ideal baking time for chicken thighs?
One of our favorite weeknight dinner recipes is chicken thighs. They’re inexpensive. They cook quickly and produce juicy results. Plus, they’re packed full of protein. They also work well for meal prep for weekday lunches or batch cooking to feed many people. But, how long should you bake them for golden, juicy chicken thighs without drying out? What distinguishes baking chicken thighs with and without bones? This article will review our best baking tips and some of our best chicken thigh recipes.
How to Bake Wings of Chicken?
Continue reading to learn how to bake chicken thighs. See our article, How to Cook Chicken Thighs Perfectly, for more details. It explains all the various ways to prepare chicken thighs. A chef who makes them every day wrote it.
How to Bake Chicken Thighs Without Bones?
You’ll become an expert baker of boneless chicken thighs. You’ll always have this juicy, tender protein on hand. You can then incorporate it into various dishes, such as salads, wraps, and grain bowls. To achieve flawless results, consistently follow our Meal Prep Roasted Chicken Thighs instructions.
Get the Chicken ready:
Start the oven at 425 degrees Fahrenheit. Once the Chicken is evenly coated, toss it with olive oil, salt, and pepper.
Cook the Chicken:
Put the chicken on a rimmed baking sheet. Roast it for about 25 minutes. Or, roast until the thickest part reaches 165°F. Or roast it until it turns golden.
Present the Chicken:
Serve the chicken whole or cut into strips crosswise.
Keep the Chicken Stored:
After allowing the Chicken to cool thoroughly, store it in a sealed container in the fridge for up to four days.
How to Bake Chicken Thighs with Skin and Bones?
Bone-in, skin-on chicken thighs pack a flavorful punch for the best value. Discover this effortless method for perfectly cooked, golden-crisp chicken thighs. We’ve adapted it from our Orange Roasted Chicken Thighs recipe.
Let the baking sheet preheat:
Preheat the oven to 500 degrees Fahrenheit and place a rimmed baking sheet in the upper third.
Set Up the Chicken:
With the skin side up, place the Chicken on the hot baking sheet from the oven and season with salt and pepper.
Cook the Chicken in the oven:
Place the baking sheet back in the oven. Continue roasting for about 30 minutes or until the chicken is cooked through and golden.
How long are chicken thighs baked for?
The time the chicken thighs take to cook will depend on their size and the oven temperature. According to USDA guidelines, roast 4-to 8-ounce chicken thighs at 350 degrees for about 40 to 50 minutes. Our basic meal prep recipe calls for baking boneless chicken thighs. Bake them at 425 degrees Fahrenheit. Bake for 25 to 30 minutes.
When the chicken thighs reach an internal temperature of 165 degrees Fahrenheit, you will know they are done. When taking the temperature of bone-in chicken thighs, insert the instant-read thermometer into the thickest part of the meat. Do not touch the bone, as this could give an inaccurate reading. If you don’t have an instant-read thermometer, use visual cues to determine doneness. Make a tiny cut in the thickest area of the thigh with a small, sharp knife so that the juices come out clear. Red or pink juice indicates that the meat is still not cooked. The meat’s exterior should be golden-brown in color and opaque, not translucent. The meat should be responsive and tender when gently pressed with your fingertips. If it’s too firm, it must be more balanced.
Recipes for Baked Chicken Thighs:
Brown rice and baked orange Chicken:
This dish is made with whole grains and high protein. It shows that being healthy and tasty don’t have to be mutually exclusive. Bake tender, juicy chicken thighs without skin in a covered skillet. Serve over brown rice flavored with orange juice and zest. Cook until the chicken is done.
Roasted Chicken Thighs with Rosemary and Butternut Baked Penne:
This recipe embodies the refined comfort food that chicken thighs can produce. Roast succulent skin-on, bone-in chicken thighs and butternut squash on a sheet pan. Roast them until cooked. Then, layer them over creamy pasta in a casserole dish. Bake until the cheese melts and the Chicken’s skin turns golden-crisp.
Chicken Fried in the Oven:
Turn skinless, bone-in chicken thighs into a succulent, juicy main course. The whole family will enjoy it on a weeknight. The thighs are placed on a rack over a foil-lined baking sheet (easy cleanup!) It was coated in a mix of mayo and mustard. Then, it was seasoned and baked until golden-crisp.
Teriyaki-Style Chicken Wings:
Ellie Krieger marinates boneless chicken thighs in soy, garlic, and ginger. She broils them to keep them moist. She cooks the thighs until crispy and cooked through, starting with the skin side down.
How to Make Chicken Tender?
Everybody has felt let down by a meal of rubbery Chicken. Chicken is a succulent, tender canvas that can hold many flavors. But, Chicken can get dry, chewy, and leathery at its worst. Please keep reading to avoid tough Chicken and discover easy ways to tenderize it.
How Do You Make Tender Chicken?
It all comes down to careful planning and sourcing.
Select the Correct Chicken:
First, “woody breast” is a texture problem caused by forced growth rate increases. It is easier to identify when purchasing fresh chicken. A plump, pink chicken is a sign of health. Woody breast-affected Chicken has unusually pale and large appearances. It can be challenging to identify when frozen.
Using a meat mallet, tenderize:
The next step is to get boneless Chicken or remove the bones so that a meat tenderizer or mallet can be used. Nobody likes their cooked Chicken to have broken bones in it.
Give the Chicken a marinade:
To make the protein even more tender, marinate or tenderize the chicken. This ensures it’s juicy and easy to chew.
Properly Cook the Chicken:
Above all, proper cooking technique is the last defense that ensures tender Chicken.
How to Make Chicken Breast Tender?
Cooking chicken breasts can be difficult because of their naturally tapered shape. The thin end of the breast is, at best, dry and chewy by the time the thickest part is cooked through.
What to do: To guarantee that boneless chicken breasts cook evenly, pound them to a uniform thickness with a meat mallet. Use the recipe to determine how thin to make the meat when using a mallet to tenderize Chicken.
How to Soften Chicken Without Using a Hammer?
If you do not have a meat mallet, pound the chicken to a uniform thickness. Use a heavy, robust object, like a rolling pin. If you are short on ingredients, you can also prick the chicken’s surface excessively on all sides with a fork. This improves the effectiveness and efficiency of a marinade or brine. But, it is better than a mallet.
How to Tenderize Chicken by Marinating It?
When grilling or pan searing chicken over high, direct heat, it’s crucial to marinate it first. These methods tend to dry out the meat.
A marinade is an acidic solution that partially breaks down a protein’s structure. This happens before the protein is cooked. This disintegration allows liquids and spices to seep into the meat. When cooked, the finished product is juicier and more flavorful. For more information, see our story on How to Marinate Chicken. You can also find the step-by-step instructions below.
Step 1- Prepare the Marinade:
For marinades to work, they need acid. Our favorites include yogurt, buttermilk, wine, citrus juices, and store-bought salad dressings. We adore this recipe (shown above) for Marinated Chicken Breast. It uses any vinegar in your pantry. Protein-breaking enzymes can also be found in ginger, guava, and pineapple fruits.
Step 2- Include the Chicken:
Place the Chicken in a plastic bag with a seal, add the marinade, close the bag, and shake to coat the Chicken evenly. Excellent for a least of two hours or as long as twenty-four. Alternately, freeze for up to 30 days.
Velvet Chicken: What Is It?
Our favorite Chinese dishes frequently feature incredibly tender chicken. This is because of a customary cooking method called “velveting.” This term usually describes the technique used to make stir fries. Marinate the meat in cornstarch. Then quickly run it through hot oil or water. When applied correctly, this method guarantees tender chicken. It remains tender even after reheating. Try it out while preparing our favorite stir-fried Chicken (shown above).
Slow cooking is the key to consistently cooking tender chicken:
If you follow the above steps, tender chicken is almost guaranteed. But, your chosen cooking method will make all the difference. Simmering, smoking, or braising are methods of cooking food low and slow. They work best for juicy, soft chicken. We adore this weeknight version of the traditional Chicken Coq au Vin (shown above). It uses the wine’s acidity to help tenderize the chicken. Short simmering times guarantee a flavorful supper.
How long does raw chicken stay in the refrigerator?
For many home cooks, Chicken is a crowd-pleasing go-to protein. But, many of us are curious about how long it lasts in the refrigerator due to its perishability. We sought the advice of Toby Amidor, MS, RD, CDN, FAND. She is an award-winning nutritionist. She is also the author of The Family Immunity Cookbook, a Wall Street Journal bestseller. We asked for her expert guidance.
How long does raw chicken stay in the refrigerator?
According to FDA guidelines, fresh whole chickens or chicken parts kept in the refrigerator will be held for one to two days. According to Amidor, “Your food shouldn’t sit out at room temperature for more than two hours. If the temperature is 90°F or above, don’t leave dishes with chicken out for more than one hour after preparing them. Check out our overview, How Long Can Cooked Chicken Keep in the Refrigerator? It has extra advice on safely handling and storing cooked chicken.
How to Keep Uncooked Chicken Cold in the Fridge?
Keep raw Chicken refrigerated at 40 degrees Fahrenheit or lower. To stop bacterial growth, refrigerate Chicken within two hours of buy. To prevent raw Chicken from spilling onto other items, Amidor suggests keeping it in a plastic bag or container in the lower section of the refrigerator. The expert advises not to store raw chicken above-prepared foods like produce. This will prevent leaks.
What is the shelf life of Chicken after the sell-by date?
The USDA recommends that fresh Chicken be cooked or frozen within one to two days of sale. According to Amidor, many retailers and processors may choose to date packages of fresh or uncooked meat and poultry products.” Federal regulations do not generally must product dating.” If in doubt, discard it. See our guide, How to Tell If Chicken Is Bad, for advice on safe handling and perishability.
How Much Time Can I Keep Chicken in the Freezer?
A fresh chicken can be frozen for up to a year in its raw form and parts for up to nine months. According to Amidor, if you are freezing chicken, store it in its original package. Do not store it for longer than two months.” It is advised to place the packages inside plastic bags. Or, overwrap them with freezer paper, plastic wrap, or airtight heavy-duty foil.”
How Much Time Can Cook Chicken Keep in the Refrigerator?
You’ve probably wondered how long cooked chicken is good for. Perhaps you’ve wondered this if you’ve ever meal-prepped chicken breasts. Or, if you’ve found yourself with leftover roast chicken. Here, we explain how long cooked chicken is kept in the refrigerator. We also offer usage suggestions.
How Much Time Can Cook Chicken Keep in the Refrigerator?
The USDA advises that leftover cooked chicken be stored in a refrigerator at 40 degrees Fahrenheit or lower. Consume it within three to four days. Refrigeration slows but does not end bacterial growth, according to the USDA.
How to Keep Cooked Chicken Cold in the Refrigerator?
After cooking and cooling, place the Chicken in the refrigerator no later than two hours. Refrigerate the remaining chicken at 40 degrees Fahrenheit or lower. Use an airtight container. Make sure the contents and date are written on the container.
How Can I Tell When Chicken Is Overcooked?
To the touch, cooked Chicken ought to feel solid and dry. If it feels soft to the touch or has a slimy texture, you’ll know it’s gone wrong. According to the USDA, throw away poultry that smells bad or changes color due to spoilage. It may also take on a green or yellowish cast. If in doubt, discard it.
What to Do With Cooked Chicken?
Cooked chicken leftovers are very helpful for easy lunch ideas. You can use them in grain bowls and salads. For example, you can make this sophisticated Spring Chicken Salad. You can also use leftovers to make great sandwiches. For example, slice them for Greek Chicken in a Pita or chop them for Chicken Salad Rolls. You can also get fancy with a Chicken Bahn Mi with Apple-Kale Slaw (see above).
Any recipe calling for shredded rotisserie chicken can also use leftover cooked chicken. These recipes include hearty favorites. For example, Buffalo-Chicken Macaroni and Cheese and Chicken Pot Pie. Also, Chicken Cordon Bleu Quiche and Chicken and Cheese Enchiladas. When it comes to hearty casseroles, cooked chicken makes a great addition. For example, in the beloved Chicken and Tater Tot Casserole. And in the Chicken Tortilla Dump Dinner. Here are other creative ways to use up leftover Chicken. These include Healthy Chicken-and-Cheese Stuffed Sweet Potatoes and Teriyaki Chicken Fried Rice. Add the diced Chicken toward the end of cooking to warm through. You could also try Turkey Hand Pies with Butternut Squash and Kale. Substitute Chicken for the turkey. In need of more motivation? See our guide to Remaining Chicken Recipes.
Heath Goldman published “The Best Ways to Use Up Leftover Chicken” on Food Network Kitchen:
Happy reading if you’re here because leftover Chicken is like a present to yourself. Both dark and light meat have countless uses. Slicing it up and enjoying it with a side of simple roast vegetables is perfectly fine. Our goal is to inspire you so that the first and second days of leftovers remain interesting.
A list of our top recipes for leftover Chicken can be found below:
First, here’s an excellent tip for coming up with ideas for leftover chicken on your own. You can use your leftover chicken in any recipe that calls for rotisserie chicken. We’ve also developed three main categories of ideas for using leftover chicken. These are: sandwiching, mixing, and topping. Allow us to clarify.
Sandwiching places Chicken between layers of bread, tortillas, hard-shell tacos, or even lettuce. A great example is a basic chicken club sandwich. It consists of chicken breast, bacon, lettuce, tomato, and mayo. Likewise, chicken tacos are. You can stuff the remaining chicken into hard shells. Or roll it up in tortillas with your preferred toppings. Add chopped tomatoes, avocado, and pickled jalapeño. To make chicken and cheese quesadillas, sprinkle one tortilla with the ingredients. Cover with another and bake until the cheese is melted. Roll up Chicken, shredded carrots, and cilantro leaves in big lettuce leaves. A creamy salad dressing adds flavor. It’s a low-carb option to consider.
When we say mix, we mean adding leftover Chicken to recipes you already know how to make. When preparing your favorite pasta dish, add the chopped chicken chicken to the end. Cook it for a few minutes to reheat it thoroughly. Add leftover chicken shreds to microwaved mac and cheese. Finish with buffalo sauce. That’s a great way to end the day. Please include it in your favorite casserole recipe. Add it to the soup and let it simmer so the flavors combine. When you mix it with stuffed pepper filling, well, you get the idea.
Lastly, consider using leftover Chicken topping for salads, baked sweet potatoes, and pizzas. Top leftover Chicken with salsa and serve over cooked rice. Shred it, add it to nachos, and mix it with chipotle chili powder.
Hopefully, you’re feeling creative by now, and to help you along, here are the recipes we promised.
Rice Casserole with Chicken (above):
This skillet casserole is a complete meal. It has cheese and shredded leftover chicken. It also has rice, an enough of broccoli, and plum tomatoes. In a skillet, whisk together all the ingredients; bake for 20 minutes or so, then broil for a golden, crusty top.
Tacos with Chipotle Chicken:
What’s the critical component of this easy recipe? Most supermarkets have canned chipotles in adobo sauce in the Mexican section. Infuse shredded Chicken with just one of the smoky-spicy chiles for instant flavor. Keep the remaining can in the fridge for marinades, wing sauce, and scrambled eggs.
Pasta with Buffalo-Chicken and Cheese:
Fun fact: You can always have thirds when you add Chicken to mac and cheese. Well, maybe not thirds. You’ll feel better about adding protein to counterbalance all those cheesy carbohydrates. This mashup dish creates an enticing casserole. It uses leftover shredded chicken, blue cheese, and buffalo sauce.
Healthy Sweet Potatoes Stuffed with Cheese and Chicken:
Try this instead of slathering sweet potatoes in butter. Stuff halves with scallion, avocado, salsa verde, cheddar cheese, and leftover chicken. This 17-gram protein-rich dinner is incredibly filling, with only 400 calories. It’s also easy to clean up.
Curry of Chicken and chickpeas:
Curry for a weeknight in a hurry? This recipe takes 40 minutes or less. Sprinkle leftover chicken into a tasty base of tomatoes. Add shallots, ginger, and curry powder. Naan is recommended to mop up all the broth.
Chickpea Enchiladas:
It’s not a tortilla issue. Cut zucchini into ribbons with a vegetable peeler. Instead of using tortillas, wrap them around a cheesy chicken filling. Ingenious and pleasantly low in carbohydrates. You deserve it, so top your creation with generous dollops of sour cream.
Sheet Pan Chicken Pot Pie with All-Crust Ingredients:
The entire crust fandom is invited. Using a sheet pan to bake chicken pot pie increases the surface area and produces a more flaky pastry. Generally, chicken pot pie recipes are a great way to use leftover chicken. This one is straightforward to make, with less than 30 minutes of hands-on time. Excellent on a weeknight.
Salad de chicken:
Finally, but by no means least, here’s Jeff Mauro’s five-star chicken salad recipe. The creamy recipe uses dried cranberries instead of the sweet and tangy grapes. Grapes are typically found in chicken salad. This gives it a more contemporary look. Chopped celery and toasted walnuts provide a great crunch.
How to Warm Up Steak?
Cooking steak to the right temperature requires time and effort. This is true regardless of whether you prefer rare, medium, or well-done. It’s a skill that chefs take great pride in mastering. The same care and attention to detail should be used when reheating leftovers. The good news is that you can savor the leftovers just as much as the original dish. You can do this if you know how to reheat steak properly. Continue reading for more information on the various methods.
How to Reheat a Steak the Best Way?
The best way to reheat a steak is to cook it so that the center is juicy and melt-in-your-mouth. Maintain the same crispy exterior. There are many methods for reheating steak. The most effective method varies. It depends on whether you’re reheating individual slices or a large cut of meat. Sear a piece of steak in a pan after warming it in the oven to prevent it from drying out. You might be better off quickly cooking smaller pieces of meat on the stovetop. You could also use pre-cut steak pieces.
How to Warm Up Beef in the Oven?
The best method for reheating thicker meat cuts is in the oven.
- The steak should be put on a cooling rack. Start by arranging your steak on a cooling rack-lined sheet tray. Placing the steak on a rack raises it off the sheet tray. This allows heat and air to flow from all sides. It also allows any excess fat to fall off, rather than collect beneath the meat.
- Raise the steak’s temperature to ambient. Set it aside on the counter’s rack while you preheat the oven.
- Reduce the oven’s temperature. Preheat your oven to 250 degrees Fahrenheit. This will help the steak reheat from the inside out. It will preserve its juices because the temperature is lower and gentler.
- The steak needs about 20 minutes to reheat. Bake the steak for 20 to 30 minutes. Remove it from the oven when an internal meat thermometer reads 110°F. The thickness of your steak cut will determine how long it takes to reheat.
- Sear the steak quickly. Finally, heat some neutral oil in a hot pan. Sear the steak on each side for one to two minutes. This will recreate the crispy, crunchy crust.
How to Warm Up Steak on the Range?
Depending on its thickness, it may be optional to cook your meat in the oven beforehand. On the stovetop, you can quickly reheat thinner steak cuts, like flank or skirt, in just one step. This method is beneficial if you want to reheat thin slices of steak or small bits of steak.
- Raise the steak’s temperature to ambient. Just like with the oven method, the steak must come to room temperature to heat through all the way through.
- In a skillet, preheat to medium. When the steak is at room temperature, put some neutral cooking oil in a skillet over medium heat. Use vegetable or grapeseed oil.
- Sear the steak for a short while on each side. After adding the steak to the skillet in a single layer, cook it on each side for two to three minutes. Take an internal temperature with a meat thermometer if you need to figure out how done the meat is. A rare steak should register 120 degrees Fahrenheit. A medium steak should register 140 degrees. A well-done steak should register 160 degrees.
How to Use the Air Fryer to Reheat Steak?
Air fryers are excellent for reheating steak. They function like a convection oven, with heat and air flowing from all sides. Air fryers cook food far faster than traditional ovens. You can reheat food much faster in an air fryer. A crispy crust is also aided by the air circulating. You can reheat any steak using this method.
- Adjust the temperature of the air fryer to 350 degrees.
- Place the steak inside the air fryer’s basket. Close the drawer after placing the steak straight into the air fryer basket.
- For up to five minutes, air fry. Depending on the size of the cut of meat, cook the steak for three to five minutes. If the piece is incredibly thick, cook it for an more minute or two.
How to Use Any Extra Steak?
Having leftover steak on hand is a great way to prepare quick meals. Warm up a few slices. Serve them with scrambled eggs for a simple steak and egg dish. It’s a quick and filling breakfast. Presliced steak works well for these simple fajitas (shown above). Toss a few pieces with sliced onions and peppers in a hot skillet. Then, serve with warm tortillas and salsa. Leftover steak is the key to adding flair to an uninteresting weeknight salad. Finally, you can use it. Toss a few pieces of steak into a bowl of hearty greens. This simple addition adds flavor, protein, and a little indulgence. Whether you eat it all or keep it cold.
How to Use Extra Brisket?
Tender, juicy brisket is the main attraction at any special dinner. It’s the centerpiece for holidays like Rosh Hashanah, Passover, and more. Brisket cuts are so significant that you’ll have leftovers, even if some take seconds. It’s delicious to reheat leftover brisket, but sometimes you want to try new things. Brisket can take on many flavors, making it incredibly versatile. It keeps you full for days. These are our best recommendations for brisket leftovers that are next level.
How to Use Extra Brisket?
First, once your leftover brisket has cooled, store it in an airtight container with its sauce. Or, wrap it tightly. Keep refrigerated for three to four days.
If you have leftover corned beef brisket, note that it works great in these recipes, too. You might want to adjust the seasoning. Corned brisket is saltier than other briskets due to its brining process.
Every day, have Taco Tuesday:
Amazing tacos are simple to assemble. Your meat must be tender and melt-in-your-mouth good. All you have to do is grab your preferred taco fillings. Chop up some leftover brisket. Pan-fry it briefly in oil with a generous pinch of chili powder. Then stack everything into warm tortillas.
Do you want the entire recipe? Breakfast tacos with leftover brisét are the best. Leftover brisket becomes a juicy taco filling with sweet-and-smoky salsa. Soft scrambled eggs only enhance the flavor. You can also use refried beans instead of eggs if you’d like. Or, omit the tortillas. Add diced brisket as a topping to make this Spicy Taco Salad an all-out fiesta.
Prepare a (Delicious!) Sandwich:
Tender brisket slices go well with sandwiches. Take your favorite bread. Spread some delicious condiments. Add onion, pickle, or another vegetable for crunch. Then, cover it all with brisket. Or, try this West 52nd Street Sandwich with grilled steak instead of brisket. Brisket can easily be substituted for roast beef in almost any sandwich recipe. Dreams of a delicious, melt-in-your-mouth French dip sandwich are created with this one.
Prepare an Adorable Hash:
A dish called hash is made to make use of leftovers. This Crispy Fried Eggs and Leftover Brisket Flannel Hash was made specifically for brisket. A colorful hash of sweet potatoes, apples, and beets is enhanced with tons of flavor. It comes from just three slices of meat. Are you feeling schmaltz? When you want extra flavor and crispiness, use it in place of oil.
Additionally, any brisket can be used in most corned beef hash recipes. Since brined for extra saltiness, taste and adjust the seasoning as needed. This is especially true with corned beef.
Make Better Nachos:
How about nachos for supper? Indeed! Few things are more popular among diners of all ages or more straightforward to prepare. Nachos with leftover brisket are delicious and filling. Spread restaurant-style tortilla chips on a platter. Top with shredded cheese, chopped brisket, chopped jalapeños, onions, and refried beans. Bake at 450 degrees F until heated and the cheese is melted. This is how you customize them. Add some fresh garnishes like chopped cilantro, pico de gallo, and sour cream to finish. Or, you can use sliced brisket instead of roast beef in this BBQ Roast Beef Nachos recipe. Or, top these vegetarian nachos with brisket. This hearty, meaty twist on the original.
Prepare a Fast Bibimbap:
In roughly the same time it takes to cook rice, you can have Bibimbap on the table if you have leftover sliced meat. Take a cue from Marge Perry’s Simple Weeknight Bibimbap. Instead of cooking the steak, serve each bowl with a few slices of reheated brisket. You could even substitute brisket for bulgogi beef. Then, you could make Bibimbap according to Jen Lee’s recipe.
Dress Up a Salad:
You can start with a bowl of greens, chopped veggies, or cooked grains. Brisket transforms almost any salad into a protein-packed meal. For added flavor, add diced brisket to this Greek Dinner Salad. Or, replace roast beef in this Italian-inspired Orecchiette Salad with sliced brisket. Think of these as the perfect salad days.
Conclusion:
Mastering the art of cooking thin chicken breast in the oven is a culinary triumph. It delights the taste buds and impresses guests. Follow our expert guide. You’ll undoubtedly create a dish that satisfies hunger and leaves a lasting impression. Elevate your cooking skills with this foolproof method. It ensures a delicious meal every time.
FAQs Art of Cooking Thin Chicken Breasts:
Q: How long should I cook thin chicken breasts in the oven?
Ans: Cooking thin chicken breasts requires precision. Preheat your oven to 375°F. Bake for 15-20 minutes, turning halfway through. This guarantees uniform cooking and a juicy end product.
Q: What’s the ideal thickness for thin chicken breasts?
Ans: Aim for chicken breasts that are around 1/2 inch thick for optimal results. This thickness ensures quicker and more even cooking. It prevents the risk of drying out.
Q: Should I marinate thin chicken breasts before baking?
Ans: Absolutely! Marinating adds flavor and keeps the Chicken moist. Consider a blend of olive oil, lemon juice, garlic, and herbs for at least 30 minutes before cooking.
Q: Is it possible to substitute a rub for a marinade?
Ans: Certainly! A dry rub of spices and herbs enhances the flavor. Apply it generously and let the Chicken sit for about 15 minutes to absorb the flavors.
Q: Is it necessary to pound thin chicken breasts?
Ans: Pounding thin chicken breasts to an even thickness promotes uniform cooking. Aim for a thickness of approximately 1/4 inch using a meat mallet.
Q: Should I use a baking sheet or a baking dish?
Ans: For optimal heat distribution, use a baking sheet. This ensures that the Chicken cooks evenly, avoiding any sogginess.
Q: How do I prevent thin chicken breasts from drying out?
Ans: To keep your Chicken moist, baste it with melted butter or olive oil every 5-7 minutes while baking. This adds flavor and prevents dryness.
Q: Can I use a meat thermometer to check doneness?
Ans: Absolutely! Ensure the internal temperature reaches 165°F. This guarantees the chicken is safe to eat. It also ensures that it remains juicy.
Q: Is it possible to cook thin chicken breasts from frozen?
Ans: While it’s not ideal, you can cook thin chicken breasts from frozen. Increase the cooking time to around 25-30 minutes, ensuring thorough cooking.
Q: How can I add a crispy texture to thin chicken breasts?
Ans: Before baking, coat the chicken with breadcrumbs or panko for a delightful crunch. This adds a crispy layer without compromising the tenderness inside.
Q: Are there alternative cooking methods for thin chicken breasts?
Ans: Certainly! Besides baking, you can pan-sear thin chicken breasts for a quick and delicious option. Heat a skillet over medium-high heat and cook for 3-4 minutes per side.
Q: Can I use a convection oven for cooking thin chicken breasts?
Ans: Yes, a convection oven is an excellent choice. It ensures even cooking by circulating hot air. This produces a perfectly cooked and flavorful dish.
Q: What herbs and spices complement thin chicken breasts?
Ans: Experiment with rosemary, thyme, garlic powder, and paprika. This flavorful blend enhances the natural taste of thin chicken breasts.
Q: Are there any recommended side dishes for thin chicken breasts?
Ans: Pair your Chicken with roasted vegetables, quinoa, or a fresh salad. This creates a well-balanced and satisfying meal.
Q: How can I ensure a golden-brown crust on thin chicken breasts?
Ans: Finish cooking under the broiler for the last 2-3 minutes for a golden-brown exterior. Observe to avoid burning.
Q: Can I cook thin chicken breasts in a foil packet?
Ans: Absolutely! Create a sealed foil packet with your marinated Chicken for a moist and flavorful result. Bake for the recommended time.
Q: What’s the importance of letting thin chicken breasts rest before serving?
Ans: Allow the chicken to rest for 5 minutes before slicing. This ensures the juices redistribute, keeping the meat tender and flavorful.
Q: How can I infuse more flavor into thin chicken breasts?
Ans: For an added burst of flavor, consider stuffing thin chicken breasts. You can use ingredients like spinach, feta, or sundried tomatoes.
Q: Can I use a flavored oil for marinating thin chicken breasts?
Ans: Certainly! Infusing olive oil with herbs like basil or thyme adds a layer of complexity to the flavor profile of your dish.
Q: What’s the best way to store leftover thin chicken breasts?
Ans: Refrigerate in an airtight container for up to 3 days. To reheat, use a microwave or oven, ensuring not to overcook.